In my quest to finding all sorts of things to DIY,i came across this man's site.Thomas J. Elpel . Never heard of him? That's ok,until today i hadn't either,but this guy's idea's and tested ''by using '' are very interesting.Take time to go by sometime and look around.If you are into nature,living green or a survivalist,you will learn something! leave me your ideas or imput if you would.
betty
~~~~~~~~~~~~~~~~~~~~~~~~~survivalist??MAKE YOUR OWN SHOES! OUT OF TIRES!!~~~~~~~~~~
HOLLOWTOP.COM-
I go barefoot as much as I can, but like most people, I have tender feet--because I don't go bare foot all the time. Moccasins are ideal for camping, at least to a point. I can really feel the earth through them, and it has a profound psychological on me, making me feel so much more in tune with my surroundings. The trouble with moccasins is they wear out--fast. It takes me about eight hours of physical labor to tan a deer hide, several more hours to stitch a pair of moccasins, and generally one or two days of hiking to wear the first hole in them. The holes always start at the toughest points on your foot, so they are not initially a problem. You can get several more days of hiking in before you have to stitch in a new sole. Still, that is not a very long time at all. I have heard that some Native Americans carried multiple pairs of moccasins on journeys and spent each evening around the campfire fixing them.
I may practice primitive camping, but I also have to face the modern realities of the clock. My camping trips are typically short, and full. I always have a lot of things I want to do while I am out. Fixing my moccasins every day is not one of them.
To solve that problem, I have tried over the years many marriages between buckskin and rubber to make lasting soles on my moccasins. The "paint-on" sole, a mixture of ground up tires and Barge Cement glue, does not work all that well. It helps, but even that wears through quite quickly under harsh conditions, and the rubber coating makes it difficult to dry out the leather of the moccasins. More so, they are not very patchable once a hole gets started.
I have also tried working with the "crepe soles", a thick sheet of rubber cement that you can buy, cut, and glue to the bottoms of shoes. The problem I had with these is that my foot no longer stayed in the right place on my moccasins. My foot was typically sliding off the back edge of the sole. Jack then told me a story about Indians from Mexico coming to the United States and winning foot races in sandals cut from tires. I've been interested in using tire soles before, but it seemed like I would have to glue or stitch the tire to the moccasins. I had reason to doubt that it would work. I also once had a pair of tire sandals, made in Mexico, where the leather lacing was nailed to the tire soles. Those came apart within a couple of days.
Jack had never seen the tire sandals that were reportedly used by the Mexican Indians, but decided to see what he could do anyway. I have to say I was quite impressed with the final product, a sort of Teva-style sandal.
I was most impressed with the fact that there was no glue, and no stitching or strapping on the bottom of the sole where they would be exposed to the ground. Instead he cut the sole with some side tabs out of the tire as one contiguous piece. The first model was a little crude in appearance, but was amazingly comfortable. I too had to make a pair for the expedition.

The field tests of our sandals were quite exciting. The tire sandal and moccasin combination meant we had "modular" shoes. We wore both the moccasins and the soles when hiking, and then just one or the other around camp. We could use just the moccasins for stalking, or just the tires for walking in water. We climbed 10,000 foot peaks twice and
now go visit hollowtop to read rest of directions!
~~~~~~~~~~~~~~~~~~~~~~~~~~~~~~~Making a Horsetail Pan Flute ~~fun!!!!~~~~~~~~~
Strolling by a patch of horsetail (Equisetum hyemale), it is hard to resist cutting a length of this slender, abrasive plant and blowing across an open end for its sharp whistle effect. Upon witnessing a friend play his pan flute one day, I realized that I could fashion one out of horsetail.
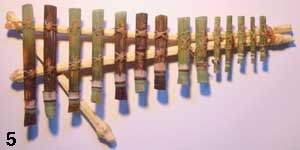
This horsetail pan flute is easy to make, but takes patience and dexterity, especially when securing each piece of horsetail to the frame. I initially made the mistake of using fresh horsetail when assembling my first pan flute. This resulted in whistles that shrank away from the frame and the yucca bindings, as well as buckled into unattractive, tone-less hanks of horsetail. It seems very important to thoroughly and slowly dry whole horsetail stems in a cool place devoid of direct sunlight. For my material in my locale, this process took three weeks.
The next step is to cut the horsetail into suitable lengths to produce whistles of different pitches. I find that using a swift chopping motion with an antler cleaver works well, giving a clean cut without crushing the horsetail (photo 1). When cutting horsetail into whistles, you don't want pieces that are totally hollow. One must leave an intact node, or cross-wall, inside the length of each piece (photo 2). Some species of Equisetum branch at these nodes. I have not had success making whistles out of these species. Experiment, experiment, experiment! Knowing nothing about music, I cut a couple hundred pieces and blew away, setting aside those that "sounded right." Generally, the longer and/or wider the piece, the lower it will sound. Coincidentally (I whimsically prefer instinctively), when I finished selecting those whistles I deemed good enough to affix to a frame, a musician friend informed me that my arrangement decently coincided with a nearly two octave scale, starting with a C (438 Hz).
make your own flute!CLICK HERE
~~~~~~~~~~~~~~~~~~~~~~~~~~~~~~~~~~~~~~~~MAKE YOUR OWN COMPASS!~~~~~~~~~~~~~~~~~~~~~
SURVIVAL TOPS~MAKE YOUR OWN=READ MORE
Knowing how to make a compass is a great survival skill. You can make your own emergency directional compass from ordinary materials you are likely to have at hand. This handmade compass operates on exactly the same principle as any expensive compass available for purchase such as those manufactured by Suunto or Silva. In a survival situation where you need to know which way is what, knowing how to make your own compass is a good survival skill to have.
~~~~~~~~~~~~~~~~~~~~~~~~~~~~~~~~~~The Heritage Blade(knife)DIY.~~~~~~~~~~~~~~~~~~~
The Heritage Blade
Make your own antler- or bone-handled hunting knife.
by Keith Mccafferty
A handmade knife, its handle crafted from the headgear of an animal obtained in the chase, is a treasured heirloom that will pass the stories of its maker from generation to generation. Anyone with a steady hand and a few simple tools can make one in an afternoon session at the workshop.
[Step 1]
Cut the Handle
Select an antler or horn and cut it to length with a hacksaw, then file and sandpaper the piece until it fits your hand.
[Step 2]
field&stream~make your own knife-click here
~~~~~~~~~~~~~~~Learn to start a fire with no matches!~~~~~~~~~~~~~~~~~~~~~~~~~~~~

field and stream-outdoor skills-click to read!
~~~~~~~~~~~~~~~~~~~~~~~~~BASIC SURVIVAL~DONT MISS THIS SITE~~~~~~~~~~~~~~~~
Guys you really need to look at this site!So many great diy projects here...
here a just a few of them!
Survival Skills
How to sleep outdoors without tent or sleeping bag.
5 basic survival skills.
Making rope.
Blacksmithing 101.
Sinking a well.
Fishing tips.
The basics of muzzle loading.
Recharging Alkaline batteries.
Making colloidal silver.
Things to do with duct tape.
Escape & Evasion pt.1.
Escape & Evasion pt.2.
tOMINELPASO~click to GO NOW!!!
~~~~~~~~~~~~~~~~~~~~~~~~~~~~~~~~MAKE YOUR OWN GHILLIE SUIT!~~~~~~~~~~~~~~
By now most of us know what a ghillie suit is..They are killer! But for those tightwads(like me..lol) the prices are a little steep expecially if we can do it ourselves! and you can.Here is one of the easiest online directions for the Ghillie suit i have found.Follow these directions and you will become almost invisable in the woods..Great for hunting or in the case of WTSHTF,may mean your life....
How to Make a
Ghillie Suit
A "Ghillie" is a Scottish game-keeper. Pronounce the word "Gee' lee", starting with the glutteral gee (guh), not a jay sound (jee). These guys found that they could sew strips of burlap to their clothes, then wait patiently for poachers to come by -- as long as they remained still, their game would nearly step on them.
The real professionals at making Ghillie Suits are military snipers. Making a suit and using it to stalk your instructors is part of the graduation from sniper school. I was once stalked by a special forces sniper from 500 meters across a field of grass, bushes, and general scrub -- at the end of 4 hours, he stood up TEN METERS BEHIND ME! -- I never saw him -- even though I knew he was out there somewhere.
Good, professional-looking Ghillies can be seen in the movies "Sniper" and "Clear and Present Danger".
In most lighting conditions, detection is a result of both brightness and shape contrasts with the background. Most camouflage fatigues do a pretty good job of matching the general brightness level of foliage, desert, etc. The camouflage pattern printed onto the material attempts to match the
shapes inherent in the background as well. Unfortunately, all camouflage fatigues follow the human form pretty closely -- resulting in an overall shape that looks like a human, not natural background. The problem lies in the fact that the fatigues are trying to duplicate a three-dimensional pattern of shapes (foliage, usually) with a two-dimensional camouflage pattern applied to a sheet of fabric. In most lighting conditions, it don't work very well. Now, camouflage fatigues and jackets and such certainly blend in much better than blue jeans and T-shirts, but they aren't totally effective -- and cannot be without adding three-dimensional noise to the essentially two-dimensional form of a human.
A Ghillie Suit is a very effective camouflage technique that uses strips of material to break up the outline of the wearer. This fools the eye of the enemy -- the brain sees no recognizable shapes. By adding strips of burlap, or camouflage netting, or branches off bushes to your clothing, you create
the three-dimensional pattern disruption I was talking about above. The advantage comes from creating patches that are nearly the same color as the environment, while simultaneously creating ultra-dark shadows alongside. Printed fabric cannot create black patches as dark as real shadows the shadow is about 2 orders of magnitude darker than the darkest printed black fabric.
How to make a Ghillie Suit:
1. Obtain an old pair of coveralls -- this is called the foundation of the suit. In a pinch a fatigue blouse and pants will suffice.
2. Get some burlap from your local fabric store (about 4 yards). The more burlap you use the more effective (up to a point) will be the Ghillie Suit -- however, it will rapidly become heavy (Army and Marine sniper suits weigh up to 20 pounds or more).
3. Dye the burlap some dark to medium
DIY GHILLIE SUIT-CLICK NOW
~~~~~~~~~~~~~~~~~~~~~~~~~~


1 comment:
Hello!
I am contacting you because I am working with the authors of a book about blogs, and I'd like to request permission to use a photograph of yours in this book. Please contact me at hannah@wefeelfine.org, and I'd be happy to give you more information about the project. Please paste a link to your blog in the subject field. Your assistance is greatly appreciated.
Sincerely,
Hannah
hannah@wefeelfine.org
Post a Comment